Brrrrrrrrrrrr it is very cold here in my lounge tonight, I could not get the fire going and the fiancee is out playing hockey...where is a nice big strong man when you need him?
I have a new page to share today here it is:

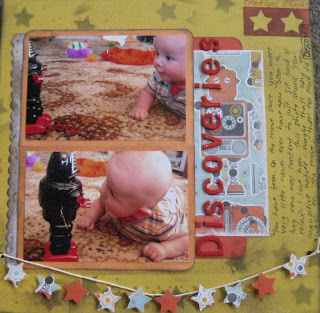
I love love loveeeee this page! I love the photos and I love the papers, this is my son when he was about 4-5 months old just checking out the new robot we had got him its really cool you turn the key to wind him up and he starts walking and sparks fly in his head (they are covered obviously) the cool thing about this toy is that he loves it more now than he did then.
I found the paper at spotlight and I fell in love with it (the robot paper) I had no idea at the time what I would use it for and it has kind of been in the paper box for a long time, that was until I found these awesome pictures of Brooklyn and this wee robot...what a perfect match huh?
I need to fix the yarn at the bottom so they go behind the stars I was going for a 'bunting' look and I think it works really well, what do you think?
I got the distress ink and blending tool out and had fun inking some black stars on the page, I am seriously loving my distress ink right now...if you dont own ink you should get Tim holtz' distress ink it rocks my world!
I think the colours just work so well together on this page and I have a little confession that I know is probably a super big no no...but...here goes...I used red nail polish to colour in the chipboard font...there I said it, kill me if you wish but its done and I love it.
I hope you enjoy this page like I do, let me know any tips or thoughts you have on it.
looks fab-u-lous ... cute wee pics and yep, loving the robots.
ReplyDeleteI'm a big fan of distress inks as well. Have a play with your blending tool on some scrap cardstock and a piece of old paper underneath it to protect your surface ... and blend the ink along the edge of your cardstock and come in a wee bit, apply more pressure and more ink to make it darker and lighter, does that make sense? Cut out a tag shape and use it as a journalling spot/tag and ink the edges like that ... fabulous effect. Have fun creating.
The string on my layout - I've attached with a wee dab of hot glue using a hot glue gun ... you can always apply double sided tape under some paper, wind a little and when it comes out, apply a tiny glue dot, rolled a little to squidge it, then put the string/twine on top of it that way ... but the hot glue gun does the trick best for me. Have fun.
The star bunting looks terrific!
ReplyDeleteI love my distress inks too! I'd like to find out more about painting with them...I've seen some people sued this technique on some projects and it looks great!
(don't tell anyone...but I use nailpolish to change the colour of emby's too ;))
wow thanks for the comments ladies it is always exciting to see someone has commented on a post!
ReplyDeleteGreat tips yet again Mrs Frizz im very 'fresh' at this scrapbooking and hot glue didnt even cross my mind I think that would be the smartest way to go about it on this layout.
I like your ideas on the journalling tag I might have to give that a go soon as well.
Kirsty - YAY im glad I am not the only one who uses nailpolish lol it can be our secret
This page looks GREAT - my only comment would be - I would love to see it in more detail!
ReplyDeleteTry the "Macro" setting on your camera (looks like a tulip) to get great close up shots..
The star banner looks great and I love the green background.. Awesome job
Lowri :-)
Thanks Lowri I will definately retake a photo of the layout using that setting, thats another thing I was really unsure of...how to upload pics of your layouts, at first I scanned it BUT my scanner wasnt big enough lol so i took a gazillion photos of layouts but the lighting wasnt the best I think I need to put the photo in good natural light something to work on maybe...
ReplyDeleteHi Shanna - photographing layouts is always tricky and I rarely do them so I find it very tricky. Basic principles still apply - I would take it outside and photograph it out of direct sunlight - either when it's cloudy or in the shade! Lay it flat on the floor and try and get directly over it so the square shape does not distort. Make sure your camera is set to take pics at best quality (you can always shrink them for uploading later) HEPAS of great info on google on how to take pics of LO's too
ReplyDelete