Sunday 14 August 2011

A layout especially for Challenge me Happy


So today I am uploading a layout I did espcially for a layout competition at Challenge me Happy. I was really blown away by the original layout by Piradee that we had to scrap-lift what an inspiring scrapbooker!
I had to look up whats 'scraplifting' meant lol I'm so new at this, scrap-lifting is a really cool idea (granted I guess you don't do it ALL the time) but copying a layout you like in some way should be a huge compliment (of course you have to say if you have copied) I think they say 'borrowing' ideas on the website I looked up which I cant remember right now...just Google it if you aren't sure.
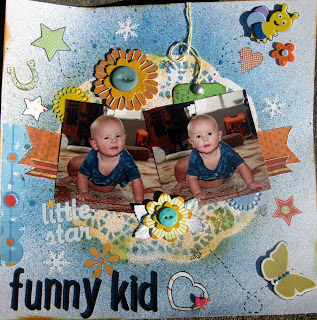
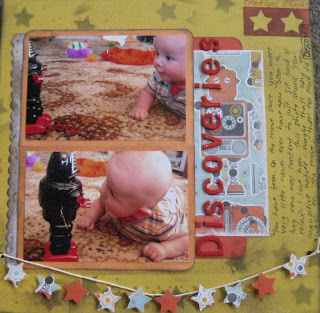
I borrowed a lot of ideas from Piradee's original layout but I am so happy with the result it is so cute and looks great in my son's scrapbook album!
All the patterned coloured paper was from a paper collection I got from the warehouse by my minds eye and the background paper is Tim holtz craft resist paper which i LOVE (I have just got some new distress inks and coloursprays so I am looking forward to trying them out on the paper).
I recently purchased a new puzzle shape punch from creative memories so i put that to use and I made the flower in the top right corner using the new circle punch I just got from creative memories I had seen someone do something similar using ribbon to make the flower but i thought paper should work just as well...and it did!
I hope you like my layout, I know I do tee hee hee :)

Oops I almost forgot to mention its this cheeky little boys birthday today he is my big 2 year old now! Seriously who pressed the fast forward button? I love this photo of him taken in may I love his face :D

Tuesday 9 August 2011

Beautiful day isn't it?

Well its a brand new day and a delightful one at that here in SUNNY Nelson in my opinion there is nothing nicer than a nice sunny winters day (maybe a slightly coolish day in summer...?...nah).

I have a new layout to share with you all, I have completed this layout to enter into a monthly challenge at Eye Candy Magic im not too sure if I can enter seeing as I am in New Zealand but I'm going to give it a shot and if not I have a super fun to show everyone :)


Eye Candy Magic is AWESOME the owner Sam makes amazing embellies and has really inspiring layouts they are really fun...like SOOOOOOOOOOOOOO fun! I dont know how I came about her blog but I'm glad I did its pretty cool you should check it out!

The competition was to use the technique 'masking' on a layout or card, masking is really cool it looks quite striking and its fun to get your colour sprays out and have a play I dont really own many fancy masks but you can get really creative with masking using punch cut outs etc. I used a doily looks cool and it was easily accessible


heres some close ups:


Like I said i had SO much FUN creating this layout everyone go get masking :)

Sunday 31 July 2011

Memorable moments layout


Good day to you wherever you may be! Its a beautiful sunny day here in Nelson couldnt ask for better weather really (well you could ask for it to be a bit warmer but its winter and that would be a little cheeky).

I have another layout to share with you all...taaadaaaa!

This layout has been a tricky one...I wanted to try make it a little different to the norm (of what I normally do) I tried: ripping the edges, sewing the edges (awful shouldnt have used cardstock), gluing on yarn, splodging glimmermist and glimmermisting a pattern onto the paper.

I had a lot of trial and error on this page, at first the glimmermist splodges looked ridiculous! so i dabbed them with my thumb and it toned down the colour and then I lightly sprayed over it, I am happy this had the effect I was after phew.

I attempted to sew around the ripped edges of the cardstock but quickly gave up and used distress ink on the corners where I had already did some sewing...thankgod for distress ink!

I managed to use up some more stickers from my stash that were just lying around waiting to be used...yay! I tried something new I added clear cracked paint to get that old vintagey feel to them, because of the type of stickers they were (plastic like stickers) the cracked paint just flaked off of most of them but owell it was worth a try!

I bought a new gadget called sew easy from artfull crafts which is here, I must admit I was not THAT impressed with it the stitcher is made out of a rubbery plasticy type of material and it really did not do a good job of poking holes in my paper (cardstock) AND on top of that it seemed to wear it down as well...I dont believe I am using it right though because surely this shouldnt happen upon the first use? I dont have the mat that comes with it I just used my cutting mat...maybe the mat is the secret? Has anyone used the 'sew easy' tool successfully and has any tips for me?

Wednesday 27 July 2011

Free online scrapbooking festival

Big Picture Classes

hmmmm not a very big icon but if you click on it, it will take you to bigpictureclasses.com you have access to a free online festival I dont know much about it but I am intrigued to say the least.

I havent been up to MUCH scrapbooking lately which is a shame :( well I have been doing mini books with my neice that took up a bit of time actually but they were quite cute.

Hopefully I can post some new layouts sometime soooooooooooooooon

bye for now :)

Thursday 21 July 2011

Something different

Here is something a bit different to the norm for me today, I have made a mini book using paper bags! I got the idea from a tutorial I found on youtube here.
The pictures aren't great I know maybe later if you would like I will retake them so they are clearer, I took them on my iPod touch using the app 'hipstamatic' I really love the effects it creates with your photos and I would love to do a layout using the photos I take on the iPod.

I made this mini book for a friend who is moving overseas (hopefully they dont see this before they receive it) It is not completely finished I would still like to decorate it a little bit more just not sure how! and of course I have to find the photos I want to use and stick them on with a bit of journalling.


It is a 10 page (in all book) with another 10 pages on 5 inserts (so 2 pages to one insert) I really loved making this project as it was alot easier than I thought it would be and the end result is AMAZING! The quality of my book could be a lot nicer I think maybe next time I will use cardboard as the strips that bind it together rather than paper just so it is a bit sturdier. The paper I used to make this was a my minds eye pack from the warehouse which I cant remember the name of but I really like it.

I changed the design a little bit on the inserts, on the tutorial the lady made them look like an actual tag and used flowers etc as the part you pull up, as you can see I just rounded the edges and left them as is, I then used decorative safety pins with ribbon tied on to them as the part where you pull the insert up I love the effect I think it makes the book look a little like a present.

so I am pretty pleased with my shabby first mini book heres a few more pictures I have taken


I think this is such a cute wee book to make, I would really love to try make a book using the wood next time I want to make a yummy baking recipe book mmmmmm!


new post with a new/ish layout


My 'perfect' kid...most of the time!

I finished this layout last week sometime and I am in love with it because I was able to use new techniques, I was able to use new products AND this page was one I had done awhile ago but wasn't completely happy with, so i jazzed it up and now i am so happy!

I should have taken a before photo! Originally it was the photo with the title and the perfection sticker, where the 3d effect is on the right side was this beautiful design that was already on the paper I bought 2 pieces so I could do a 2nd page with other photos but I had a flash of inspiration to cut out the design and layer it over the pattern to create a 3d effect! I had bought some rock candy crackle paint a couple of weeks ago but really hadn't had the opportunity to use it I really didn't know what to expect putting it on the cut out but I am so glad I did I love the glossy effect! I pretty much rock candied everything on the right lol that's how much i love it. I also glimmermisted this beautiful bit of lacey flowery ribbon I just got and it makes my heart melt...just a little.

Hope everyone is good in the big wide world of the web, we are currently on dial-up and it is not very fun at all I am addicted to reading scrapbooking blogs and the photos take forever to load...only 5 more days to go until a new 'internet' month starts so yay!


Saturday 16 July 2011

tired *yawn*

Today I held a creative memories party at my house, it went well although I didn't get a page done I could not for the life of me think about how I wanted to present my page I had another go tonight and I still don't know what to do...I am too tired to care too much tonight however so no biggy.
The 3 other people who attended did a great job, what I love the most about creative memories and the parties you hold at home is that there is no pressure to be perfect or outstanding you just have a play and you come away with a great looking first page, I think most people surprise themselves with just how creative they actually can be.

You may be interested to know I made a few purchases today though, I made about $250 worth of sales which gave me 4 half price products and $50 spending money (woop woop) so I bought a paper edging tool to give it that rough edge look, a puzzle maker punch, a sweetheart maker punch and some sticky tape refill all for the price of $63 so I did pretty OK...still wish I hadn't spent quite so much but its done now. My mother in law bought a bit but the main purchases were a flower punch and a cutting tool set, and my mother bought a star punch that actually embosses it at the same time...so I will have fun playing around with all of these toys when they arrive!

I was thinking today about what scrap booking means to me and scrap booking to me is the best way to honour, preserve and tell the stories behind your photographs. I love looking at photos, new or old but there's only so much looking you can do before you think ok next...with scrap booking your giving photos life again and telling stories that will be treasured for generations.

Well I might go to bed just wanted to write in my blog a little to keep up to date with it all...

g'night


Friday 15 July 2011

Another day, another page to share

Brrrrrrrrrrrr it is very cold here in my lounge tonight, I could not get the fire going and the fiancee is out playing hockey...where is a nice big strong man when you need him?
I have a new page to share today here it is:


I love love loveeeee this page! I love the photos and I love the papers, this is my son when he was about 4-5 months old just checking out the new robot we had got him its really cool you turn the key to wind him up and he starts walking and sparks fly in his head (they are covered obviously) the cool thing about this toy is that he loves it more now than he did then.

I found the paper at spotlight and I fell in love with it (the robot paper) I had no idea at the time what I would use it for and it has kind of been in the paper box for a long time, that was until I found these awesome pictures of Brooklyn and this wee robot...what a perfect match huh?
I need to fix the yarn at the bottom so they go behind the stars I was going for a 'bunting' look and I think it works really well, what do you think?
I got the distress ink and blending tool out and had fun inking some black stars on the page, I am seriously loving my distress ink right now...if you dont own ink you should get Tim holtz' distress ink it rocks my world!
I think the colours just work so well together on this page and I have a little confession that I know is probably a super big no no...but...here goes...I used red nail polish to colour in the chipboard font...there I said it, kill me if you wish but its done and I love it.

I hope you enjoy this page like I do, let me know any tips or thoughts you have on it.

Thursday 14 July 2011

Baby faces


Yet another layout to share with you all, this page I created at a creative memories workshop I attend once a month its run by Sheena Pearson who is a creative memories consultant and you pay $12.50 for an all day workshop you have access to all of Sheena's tools and can purchase creative memories products from her on the day...it is a great way to get into scrap booking if you were interested in it.

In this page I used 2 new products I have just purchased my fiskars scallop border punch and my glimmermist (brown - tattered leather I think...) ohhhh and the flowers are new also!
me and mum went and checked out a nelson scrap booking shop that is run through someones home...it was A M A Z I N G check it out here, she also has an online store and there are lots of goodies there!

I worked on this page ALL day...whaaaaaaaaaaaat the right? and then I came home and changed it anyways...craaaaazy I know... anyway I am reasonably happy with this layout theres nothing I would change. I am a little bummed about the chunk of glimmermist on the bottom of the page I need to perfect the art of applying it, any tips out there?

Peek a boo

This is a recent/ish layout I would like to share with you, it is a photo of my son when he was just a wee thing, this page really was my first proper attempt at trying something new like I said earlier my previous pages were a bit 'by the book' - photo on page with a little paper framing the picture and a few rub ons or embellishments.
I actually used a layout sketch I had found on there internet here, it was from a website called Little shop of sketches which actually is a NZ site (yay) its run by a lady called Tanya in shaky Christchurch and it has a lot of GREAT layout ideas.

I personally don't feel as if this layout is complete yet, I think I will add a little more detail in the top right corner I just don't know what yet...but all in all I am pleased with this layout I was aiming for a 'vintage-nursery' vibe and I think using the paper I did (don't quote me but I think it was Kaisercraft) and the doily I have achieved my goal somewhat...

what do you think? any ideas on what else I can add in the corner?

MY FIRST BLOG! HI!

Well hellooooo world, my first blog woohoo its one of those things I have been meaning to 'get around to' doing in a long time now...you know how it goes? (well unless you are one of those awesome people who don't procrastinate like I tend to do)

Well what to say? hi? how are you? ...

No really though I have it in my head that this blog will mostly be about my not so teeny addiction to...SCRAPBOOKING, like seriously I am SUPER addicted right now!
I spend hours reading other peoples blogs, literally...anything to do with scrap booking I have listed in my Google reader list, anything that inspires me anyways!
Right now I am loving some great NZ blogs from artfull crafts and scottie crafts they contain alot of awesome information that is relevant to little ol me here in New Zealand, the other day artfull crafts had a tutorial on editing your photos which can be found here, Lowri mentions she uses Picasso by google so I checked it out and I am hooked on it what a great FREE program.

heres some photos that I have edited on Picaso:


I just love them, I feel so 'semi professional photographer' using this program...seriously if you don't have a photo editing program who needs 'photoshop' not you GO GET 'Picasso' you won't regret it!

Ummm not sure what else to say in my 'introductory' post, check my profile if you want to know more about me and my interests and likes etc. I am going to put up photos of my recent layouts so you can see what my current style of scrap booking is.

I am only a 'beginner' as such I haven't been scrap booking long but I think looking over my album you can see how my skills are slowly but surely evolving, when I first started scrap booking I would simply put a framed photo on some nice paper add a few rub ons do some journaling and tah daaaah I was done, now I like to try add a little more detail and jazz it up a little hopefully you will agree my style and skill are slowly evolving...

anyway thanks for reading this (if you did) and hopefully one day I can inspire you in some ways :-)

Shanna